

 Most site owners use Google Analytics to track their visitors, it’s really the best FREE stats tracking solution. We’ve used advanced tools like Woopra before with clients, and while they are great, most site owners can get great results from Analytics. In fact we find many clients don’t fully utilize some of the great functions of Google Analytics. One great function, which is rarely used, is Google Analytics Funnels.
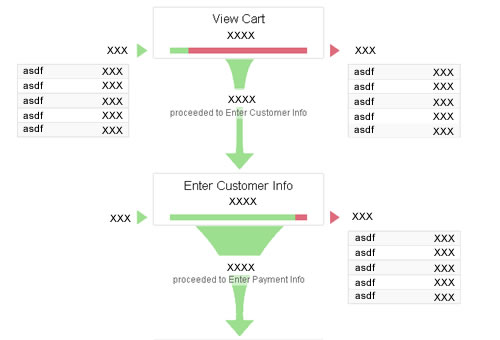
What Is An Analytics Funnel?
A Google Analytics Funnel is a set of pages which you define a visitor will visit on their way to a conversion goal. For example if your site has a home page, and order page and then a thank you page for post purchase this could be a funnel. The visitor goes from the home page to order page, to thank you page and then a conversion is recorded.
By creating an analytics funnel you’re able to see where the weakness in your sales funnel is and also able to see the conversion rates on each conversion point. In turn this will allow you to optimize your website for higher conversions and higher income.
Too many website owners are focused just on generating more traffic and when you say “optimization” they immediately think of this about Search Engine Optimisation. Our personal view is, if you’re getting traffic, the easiest way to make more money is to optimize your sales funnel. In previous experience we’ve also found that this is the most cost effective way of making profit impact.
How Do You Create A Google Analytics Funnel?
Here’s the basic step-by-step process we recommend you use to create your Google Analytics funnel, Google also has their own explanation here.
Step #1: Define The Goal
Before setting up the funnel you need to first define what the goal of the funnel is and when that goal is achieved, what page the user is on. For example in an ecommerce site the goal may be the thank you page shown after purchase. It’s important that the goal has a unique URL which is not part of the sales funnel.
Step #2: Define The Funnel
The final step to complete before setting up the funnel in Google Analytics is to define the pages, which take part of your funnel. For example in an ecommerce site the funnel may be, product page, checkout step 1, checkout step 2, checkout confirmation and then thank you page is the goal. It’s important in this process to define the actual URL’s that are involved as this will be used in setting up the funnel.
Step #3: Set Up Google Analytics Goal
Once you’ve defined the goal and the funnel you can then log into your analytics account and follow these steps to set up a goal:
- Sign in to your Google Analytics account at https://www.google.com/analytics/.
- Select the account that contains the profile you’ll be creating goals in from the Overview page.
- Find the profile for which you will be creating goals, and click ‘Edit’ under the ‘Actions’ column.
- Under the ‘Goals’ section, select one of the four sets to create your goal in (each set contains up to five goals) and click ‘Add goal.’ You can create up to 20 goals if you use all four sets.
- Enter the goal’s name so that you can quickly recognize it when viewing reports.
- Turn the goal ‘On’ or ‘Off.’ If you choose ‘On,’ that means you want Google Analytics to track this conversion goal at this time. Turning it ‘Off’ will only make the goal inactive without deleting it.
- Select the goal’s position. The pull-down menu lets you select a goal’s position from within a set so that you can control the order in which it appears from the ‘Goals’ tab in your reports, or lets you move a goal from one set to another.
- Decide one of the three types of goals you want. This can be URL Destination, Time on Site, or Pages/Visit. You can learn more about them and how to set up the goals for each one by visiting a separate Help Center article.
- Once you select the radio button for the goal type, a field for ‘Goal Details’ should appear. To learn how to fill out the fields for each goal type, please refer to this Help Center article.
Please Note These Instructions Are Available Here As Well
Step #4: Set Up Google Analytics Funnel
Now you’ve completed the goal set up you can set up the funnel by following these steps:
- Click ‘Yes, create a funnel for this goal.’
- Enter the ‘URL’ of the first page of your conversion funnel. This page should be a page that is common to all users working their way towards your goal. For example, if you are tracking user flow through your checkout pages, do not include a product page as a step in your funnel.
Please note: Funnel URLs are treated as regular expressions. For this reason, you can include wildcard characters and use other regular expression methods if you want to match more than a single URL. Learn more about regular expressions. - Enter a ‘Name’ for this step.
- If this step is a ‘Required step’ in the conversion process, select the checkbox to the right of the step. If this checkbox is selected, users reaching your goal page without travelling through this funnel page will not be counted as conversions. Learn more about the ‘Required Step’ option in a funnel.
- Continue entering goal steps until your funnel has been completely defined. You may enter up to 10 funnel steps, or as few as a single step.
- Click Save Changes to create this Goal and funnel, or Cancel to exit without saving.
That’s It! Now you’ve set up your Google Analytics Goals and Funnels so you can clearly see what aspects of your funnel can be optimized to increase sales and profits for your business.


